Showing posts with label Friday Foodie Affair. Show all posts

Friday Foodie Affair: Chicken Cordon Bleu II
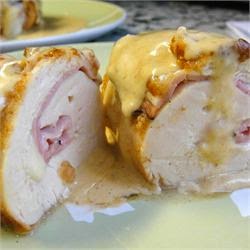

 
Chicken Cordon Bleu II
 

Recipe Source: Allrecipes.com
Photo Sources: The first photo is from the above link and the others are mine.
 
Prep: 15 min
Cook: 45 min 

Ingredients:

6 skinless, boneless chicken breast halves
6 slices swiss cheese
6 slices ham
3 tablespoons all-purpose flour
1 teaspoon paprika
6 tablespoons butter
½ cup dry white wine
1 teaspoon chicken bouillon granules
1 tablespoon cornstarch
1 cup heavy whipping cream
 

Directions:
 

1. Pound chicken breasts if they are too thick. Place a cheese and ham slice on each breast within 1/2 inch of the edges. Fold the edges of the chicken over the filing, and secure with toothpicks. Mix the flour and paprika in a small bowl, and coat the chicken pieces.

2. Heat the butter in a large skillet over medium-high heat, and cook the chicken until browned on all sides. Add wine and bouillon. Reduce heat to low, cover, and simmer for 30 minutes, until chicken is no longer pink and juices run clear.

3. Remove the toothpicks, and transfer the breasts to a warm platter. Blend the cornstarch with the cream in a small bowl, and whisk slowly into the skillet. Cook, stirring until thickened, and pour over the chicken. Serve warm.
 

My Thoughts:
 
One of the first things I noticed, after the mouthwatering photo, was the video instructions. I’ve never seen that before on Allrecipes but having that extra resource was a nice addition.

Between the video and the above written directions I had no problems making a successful Cordon Bleu. Hubby and I both really enjoyed it and it will be another recipe I revisit every so often.
 
I had actually considered making a breaded, baked version but I’m very glad I didn’t because the sauce really made the dish! I’m actually kicking myself for not saving the extra sauce. It would have been so good over…well just about anything. Maybe some saucy broccoli or a baked potato. Next time for sure!

Side note: Is smoked paprika the new ‘it’ spice? I wanted to buy a fresh container of paprika to make this dish but all my local grocery store carries is ‘smoked’. I bought it and then ended up chickening out and using my older, regular paprika anyway. Now that I think about it, it probably wouldn’t have made much difference since it was being cooked in. Right? Does anyone know if there is a huge difference in flavor between the two?


Friday Foodie Affair: Eggs in a Basket


Eggs in a Basket
 

I made eggs in a basket for the first time last weekend. I had never tried them before but let me just tell you that I will absolutely be making them again! They are buttery, eggy goodness and I'm in love. I also came to the realization that if anyone ever asked what style eggs I like most I would be clueless as to what to say. I love so many different cooking methods and really I don't think I've met an egg I didn't love. Ok, that's not entirely true, I don't like when the whites aren't fully cooked. Runny egg whites just skeeve me out.

Aaaanyway, before making Eggs in a Basket, I read a few different versions on how to cook them. In the end I just decided to wing it. I figured I couldn't mess them up and if I did then I would just try again. Here's what I did...

Ingredients:

2 slices of white bread with holes in the middle. I didn't have any fancy cookie cutters handy so I just used a shot glass.

2 eggs

Butter

Directions:

Melt butter in the pan and place two slices of bread in the pan to soak up the butter. Pick up the pieces of bread, add more butter to the pan, then place the opposite side of the bread slices in the pan. Both sides should have butter on them.

Crack eggs into the center of the bread. Cook until the underside is nicely browned and the egg whites are mostly cooked.

Flip slices over and cook just long enough to brown the bread a little and finish cooking the egg whites. Add butter to the pan if necessary before flipping.

My Thoughts:

I've already professed my love for these so I will only add a couple quick thoughts.

I think I may try directly buttering the bread instead of adding the butter to the pan. That would simplify the process and hopefully not change the flavor too much.

I also broke one of the yolks so I'll be more careful next time...although it tastes good with or without runny yolks so you can't loose either way.

Recipe/Photo Source: Yours truly.


What is YOUR favorite way to have eggs?

Friday Foodie Affair: Crisp Ham and Egg Cups


Crisp Ham and Egg Cups


Ingredients:

Nonstick cooking spray
4 slices black forest or Virginia ham
4 large eggs
salt and pepper, to taste
Fresh basin, scallions or parsley, optional

Directions:

Preheat oven to 400 degrees F.

Lightly coat 4 muffin cups with nonstick cooking spray. Fit 1 slice of ham into each muffin cup (ham will hang over the edges of cups). Crack 1 egg into each cup. Bake in middle of the oven until whites are cooked but yolks are still runny, about 13 minutes. Season eggs with salt and pepper  and remove cups carefully. Sprinkle with chopped basin, scallions or parsley.

My Thoughts:

My ham/egg cups didn’t turn out quite the way they should have. I used thicker ham slices and it messed up the cooking time and then I somehow ended up overcooking it a little.  It still tasted good but the yolks weren’t really runny so it was more like a hard boiled egg wrapped in ham, lol.


This is a quick and simple recipe and I look forward to trying it again…just with thinner ham slices.

Photo Source: Me :)


Friday Foodie Affair: Crock Pot Cream Cheese Chicken


Crock Pot Cream Cheese Chicken


Ingredients:

3 lbs chicken pieces
1 (2/3 ounce) package Italian salad dressing mix
4 tablespoons melted butter (divided)
1 small onion, chopped
1 garlic clove, chopped
1 (10 ½ ounce) can cream of chicken soup
8 ounces cream cheese
½ cup chicken broth

Directions:

Place chicken pieces in crock pot and sprinkle Italian seasoning over chicken. Sprinkle with 2 tablespoons melted butter.

Cook on low for 4-6 hours.

Melt 2 tablespoons butter in saucepan and sauté onion and garlic. Add Cream of Chicken Soup, cream cheese, and chicken broth. Stir until smooth.

Add this mixture to crock pot and cook on low for an additional hour.

My Thoughts:

I don’t think I had ever sautéed onions and garlic before making this recipe.  Can you believe that? I guess I’m an onion late bloomer.  And because I’m a late bloomer I also decided to use a lot less than the recipe calls for.

Aside from the amount of onion, I think I only made one other alteration to the recipe. I was reading some of the reviews and a couple people suggested cooking it on high for a shorter amount of time. I’m all for shorter cooking times so I set the crock pot to high for 3.5 hours. The time and temperature changes worked out nicely.  

The chicken was moist and the cream cheese mixture was delicious! I cooked up some pasta to go with it and the two together were damn good.  The leftovers also get a thumbs up.  I may try it over boiled potatoes next time but you better believe I’ll be making it again!

Recipe Source: www.food.com

Photo Source: Me :)

Friday Foodie Affair: Crockpot Mac & Cheese


This Friday Foodie Affiair is a twofer…two recipes in one. First will be Crockpot Mac & Cheese and second will be the Stewed Tomatoes I made to go with it.

Crockpot Mac & Cheese


Ingredients:

16 ounces cooked macaroni
16 ounces Monterey Jack cheese, cubed
16 ounces Colby cheese, Cubed
16 ounces Velveeta, Cubed
1 stick of butter, cut into slices
16 ounces milk
salt & pepper to taste

Directions:

Spray crockpot lightly with cooking spray. Layer 1/3 of the macaroni in the bottom. Layer half of cheese, butter, salt, & pepper. Repeat, ending with last 1/3 of macaroni on top. Pour milk over mixture.

Cook on low for about 4 hours and stir about mid-way.

My Thoughts:

The prep work went off without a hitch…cut cheese, cut more cheese, cut butter, cut more cheese. Seriously, there’s a ridiculous amount of cheese in this! It’s insane! Anyway, I successfully cooked, cubed, and layered everything and then set it to do its own thing.

At about 2.5-3 hours I couldn’t take it anymore, I had to try it. Unfortunately, it was like Pringles, once you pop you just can’t stop. I would make up reasons to go to the kitchen just so I could sneak a bite.  It was delish and kept getting better and better as it cooked.  I think at 3.5 hours I gave up and just ate a bowl.

I was good but if I make it again there will have to be some changes. For one, it’s a huge amount of mac and cheese for just two people. That normally wouldn’t be a problem because leftover mac n cheese is amazeballs…usually. That wasn’t quite the case this time.  It wasn’t bad but the leftovers definitely didn’t wow me like it did the first time around.

Next time (if there is a next time) I will use less cheese and butter…and there’s a good chance I’ll switch to bags of shredded cheese instead of taking the time to cube it.

Recipe Source: shortstopblog.com
Photo Source: Me :)


Stewed Tomatoes
 (with my trusty smilie spoon :))

Ingredients:

12 tomatoes
1 tablespoon butter
1 teaspoon salt
Pepper
1 teaspoon sugar; 2 if more sweetness is preferred
1 tablespoon cornflour dissolved in a little cold water for thickening (optional)

Directions:

1. Pour boiling water over the tomatoes to remove the skins. Alternatively, you can blanch the tomatoes: Boil enough water to cover your tomatoes. Place tomatoes in the boiling water for about 30 seconds, then transfer them to a bowl of ice water. When the tomatoes are cool enough to touch, remove the skins.

2. Cut the tomatoes into pieces. Add the butter, salt, pepper, and sugar.

3. Cook slowly over low heat (stew) for half an hour.

4. Thicken if desired with cornstarch

My Thoughts:

Growing up my Grandma used to make awesome stewed tomatoes. There were sweet and well... perfect. How she did it, I’m not sure BUT I wanted to at least try my hand at it. This version turned out ok but certainly not like I remember growing up. I think next time I’ll try to make it a little sweeter or try a whole new recipe.

Recipe Source: Wikihow
Photo Source: Me :)


Friday Foodie Affair: Tuna Times Two


For some crazy reason I’m on a tuna kick so I hunted down a couple recipes to try, Tuna Pasta Salad and Tuna Quesadilla. I, of course, tweaked both recipes to suit my bland food loving taste buds :-P


Tuna Pasta Salad


Ingredients:

8 ounces dry whole-grain elbow pasta (Barilla Plus recommended)
1 cup frozen green peas
5 ounces canned tuna, packed in water
½ cup chopped broccoli
¼ cup balsamic vinaigrette

Directions

Combine pasta and peas in a large bowl with tuna, celery and balsamic vinaigrette. Season with ¼ teaspoon kosher salt and freshly ground black pepper to taste; mix well to combine. Serve slightly chilled or at room temperature. Enjoy this salad as is or pile it over mixed greens.

Note: the original recipe has nutritional information if you’re curious.

My version of this was WAY different because…well I wasn’t really following the recipe. I accidentally used a whole box of pasta instead of half so my proportions were all wrong. I also forgot to buy peas so I used kidney beans instead. Oh, and I substituted vinaigrette for fat free Italian dressing. Like I said WAY different, haha. But the important thing is that it was very tasty even with the differences. This was also my favorite of the two recipes in this post.

My Ingredients:

1 box whole-grain elbow pasta (Barilla Plus)
Kidney Beans
3 cans tuna in water
¼ cup fat free Italian dressing
Reduced fat shredded cheddar cheese


Tuna Quesadilla


Ingredients:

2 small (3-ounce) cans tuna, drained and flaked
½ cup salsa, drained
½ cup chopped fresh scallions
1 cup shredded cheddar
3 (12 inch) flour tortillas

Directions:

Mix tuna with salsa and scallions. Fold in cheddar. Divide mixture into 1/3’s and spread each portion over ½ of a tortilla and fold into a half circle. Brown each of the 3 quesadillas on both sides in a hot pan to melt cheese. Cool a bit, cut into wedges and serve.

My Version was pretty much the same as the original except I left out the scallions and salsa. It actually ended up tasting a little too plain, even for me. I’ll have to come up with something else to add to it the next time. I also need to work on my quesadilla browning skills a bit…or I should just pay closer attention :-P